Share Private GitHub Repos With Just One Click
GitShare makes it effortless to share your private repositories with colleagues, recruiters, or students — no GitHub account required for viewers.
Get 1 free credit when you sign up
See how easy it is to share your private repos
How GitShare is Better
See how GitShare simplifies the process of sharing private repositories
Without GitShare
GitHub account required
Recipients need a GitHub account to view your repositories
Add as collaborator
Need to add recipients as contributors to grant access
Limited sharing options
Difficult to share with non-GitHub users like employers
No usage analytics
Can't track repository views or engagement metrics
Permanent access
Collaborators retain access until manually removed
With GitShare
No GitHub account required
Anyone with the link can view your repositories
One-click sharing
Generate shareable links in seconds
Universal access
Share with anyone, GitHub user or not
Detailed analytics
Track views and engagement for each shared repository
Time-limited access
Set expiration dates for your shared links
How to Share Your Code in 3 Steps
Follow this simple guide to share your private repositories with anyone
Connect Your GitHub
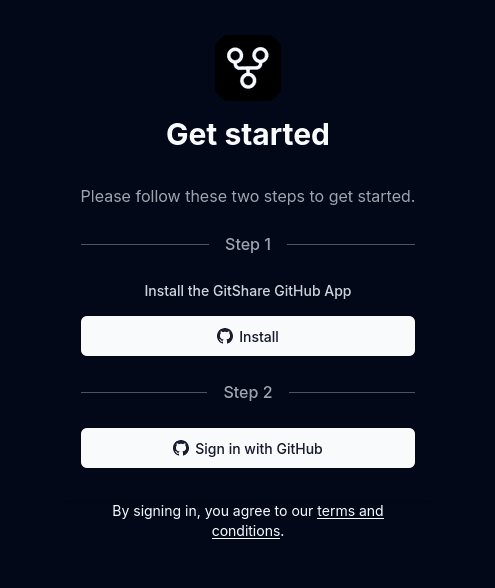
- Click 'Sign in with GitHub'
- Authorize GitShare access
- Your private repos are now available for sharing
Share Your Repository

- Select the repository to share
- Set expiration date (optional)
- Click 'Add Repository' and copy the generated link
View Analytics

- Access your repository dashboard
- View detailed analytics
- Set up email notifications for views
Powerful Features For Developers
Explore how GitShare makes sharing private repositories a seamless experience
Repository Sharing
Share your private GitHub repositories with anyone, anywhere, without sharing your GitHub credentials.
Key Capabilities
- One-click shareable link generation
- No GitHub account required for recipients
- Customizable access permissions
- Set expiration dates for shared links
Universal Access
Share with anyone, regardless of whether they have a GitHub account
Time-Limited Access
Control exactly how long your repositories can be accessed by others
Privacy Protected
Your repositories remain private on GitHub while being selectively shared
Team Collaboration
Perfect for sharing code with clients, students, or recruiters
AI-Powered README Generator
Transform your repositories into professional documentation with our intelligent README generator
README.md Preview
SkinScanAI
Overview
This project aims to provide a solution for skin condition analysis using AI. While the initial description is absent, this README will guide you through understanding the project's current structure, technologies involved, and setup process.
Key Features & Benefits
- AI-Powered Analysis: Utilizes a pre-trained model for skin condition assessment.
- Web Interface: Provides a user-friendly frontend for interacting with the system.
- Containerized Deployment: Leverages Docker for easy and consistent deployment.
- Modular Architecture: Separates the frontend, backend, and AI model for maintainability.
Prerequisites & Dependencies
Before you begin, ensure you have the following installed:
- Docker: https://www.docker.com/get-started
- Docker Compose: Generally comes with Docker Desktop, or can be installed separately.
- Node.js: https://nodejs.org/ (Required for Frontend Development)
- Python 3.11+: Recommended for Backend and AI Model Development
Installation & Setup Instructions
Follow these steps to get the project up and running:
-
Clone the Repository:
git clone <repository_url> cd SkinScanAI -
Build and Run with Docker Compose:
docker-compose up --buildThis command will build the Docker images for the frontend, backend, and start all services. It might take a while on the first run as it downloads and installs the necessary dependencies.
-
Access the Application:
Once the Docker containers are running, you can access the application in your web browser at
http://localhost:3000. (The frontend port is configured to 3000, but checkdocker-compose.ymlto confirm).
Detailed Setup (Optional - Individual Components)
If you prefer setting up each component individually, follow these steps:
A. AI Model (Optional - Mostly for development)
-
Navigate to the
AI-modeldirectory:cd AI-model -
Create a virtual environment (recommended):
python -m venv venv source venv/bin/activate # On Linux/macOS venv\Scripts\activate # On Windows -
Install dependencies:
pip install -r requirements.txt -
Run the script (for testing/development):
python script.py
B. Backend (Optional - Mostly for development/customization)
-
Navigate to the
backenddirectory:cd ../backend -
Create a virtual environment (recommended):
python -m venv venv source venv/bin/activate # On Linux/macOS venv\Scripts\activate # On Windows -
Install dependencies:
pip install -r requirements.txt -
Set up environment variables (if needed). You may need to configure the path to the model.
-
Run the backend application:
python app.pyThis will typically start the Flask server on port 5000.
C. Frontend (Optional - Mostly for development/customization)
-
Navigate to the
frontenddirectory:cd ../frontend -
Install dependencies:
npm install -
Start the development server:
npm run devThis will usually start the Next.js development server on port 3000.
Usage Examples & API Documentation
Frontend Usage
The frontend provides a user interface for uploading skin images and receiving analysis results. Detailed instructions for usage will be included in the frontend's own README.md file within the frontend directory.
Backend API
The backend provides the following API endpoint:
-
/predict(POST): Accepts an image file and returns the prediction from the AI model.- Request:
- Content-Type:
multipart/form-data - File field:
image
- Content-Type:
- Response:
{
    "prediction": "Diagnosis Result",
    "confidence": 0.87
}
The
confidencevalue represents the model's certainty in the prediction.-
Example (using
curl):curl -X POST -F "image=@/path/to/image.jpg" http://localhost:5000/predict
- Request:
Configuration Options
Backend
- Model Path: The path to the
model_acc_0.87.pthfile can be configured as an environment variable. This allows you to use a different model or specify an absolute path. Example:
You will need to modify theMODEL_PATH=/path/to/your/model.pthapp.pyfile to read this environment variable. - CORS Configuration: The
CORSsettings inapp.pycan be adjusted to restrict access to specific origins or allow all origins.
Frontend
- The frontend configuration can be found in
next.config.ts. You might want to change the backend URL if it's hosted on a different server.
Contributing Guidelines
We welcome contributions to this project! Please follow these guidelines:
- Fork the repository.
- Create a new branch for your feature or bug fix.
- Implement your changes.
- Write tests to ensure your changes are working correctly.
- Submit a pull request with a clear description of your changes.
License Information
License not specified.
Acknowledgments
- The AI model is based on publicly available datasets and pre-trained architectures.
- The frontend utilizes the Next.js framework.
- The backend uses Flask and PyTorch.
One-Click Generation
Create comprehensive, professional READMEs for any repository with just a single click. No more spending hours on documentation.
AI-Powered Analysis
Our AI analyzes your code, structure, and dependencies to create tailored documentation that perfectly represents your project.
Complete Format
Get perfectly structured documentation with installation guides, usage examples, API references, and everything else your project needs.
Choose the Right Credit Package
Pay only for what you use with our flexible credit system. Each credit allows you to share one private repository.
5 Credits
Perfect for one-time sharing or occasional use.
$1.00 per credit
Share 5 private repositorys
Create up to 5 AI generated README Documentation
Repository view tracking
No GitHub account needed for viewers
15 Credits
For developers who share code regularly.
$0.67 per credit - Save 33%
Share 15 private repositorys
Create up to 15 AI generated README Documentation
Repository view tracking
No GitHub account needed for viewers
Priority support
30 Credits
Best value for teams and power users.
$0.50 per credit - Save 50%
Share 30 private repositorys
Create up to 30 AI generated README Documentation
Repository view tracking
No GitHub account needed for viewers
Priority support
Need more credits?
Contact us for custom pricing plans for teams and enterprises
Trusted by developers from organizations and universities like


Frequently asked questions
Find answers to commonly asked questions about GitShare
Can't find the answer you're looking for? Contact our support team
Need Help or Have Questions?
We're here to help you make the most of GitShare
Email Us
contact@gitshare.meWhether you have questions about features, pricing, or need technical support, our team is ready to help you get the most out of GitShare.
Technical Support
Get help with implementation and technical issues
Feature Requests
Share your ideas for new features and improvements
Business Inquiries
Discuss custom plans and business opportunities